How to kill Commander Zhalk and get the Everburn Blade in Baldur’s Gate 3
If you’ve found yourself immersed in the captivating world of Baldur’s Gate 3, facing countless challenges and soaking in every bit of its rich lore, then you’re not alone.
Among the many quests and battles, there’s one name that probably keeps popping up: Commander Zhalk. Yep, that’s the guy standing between you and the legendary Everburn Blade.
Sounds daunting? Don’t sweat it. I’m here to guide you through, step by step.
This guide isn’t just about getting a shiny new weapon. It’s about truly understanding the game, its mechanics, and how to use them to your advantage. Together, we’ll dive deep into character creation, dissect the game’s mechanics to pinpoint those crucial spells and abilities that’ll give you the upper hand against Zhalk.
And trust me, by the time we’re done, you’ll not only be ready to face Zhalk but also feel like you’ve taken a masterclass in Baldur’s Gate 3.
But remember, this journey is bigger than just one battle. It’s about embracing the entire Baldur’s Gate 3 experience. Through our deep dive into the Zhalk showdown, you’ll pick up invaluable insights that’ll come in handy throughout your adventure.
So, whether you’ve been around the block a few times in this game or you’re just starting out, This guide will provide you with everything you need to know, including different strategies and outcomes on How to kill Commander Zhalk and get the Everburn Blade in Baldur’s Gate 3.
Why you want the Everburn Blade and how it works.
The Everburn Blade is not just any weapon; it’s a symbol of triumph over one of the game’s early challenges.
While it doesn’t possess the traditional +1 bonus to attack and damage rolls that many D&D enthusiasts might expect, it compensates this with an additional +2d4 fire damage.
This fiery attribute makes it especially impactful in the early stages of Baldur’s Gate 3. Whether you’re a Paladin, Lae’zel, or Karlach, this blade can be a significant asset in your arsenal.
However, one curious aspect of the blade is its ever-present fiery aura, which means characters will always carry it unsheathed, likely due to its fiery particle effect.
If you’re eager to harness the power of this blade, it’s essential to understand its stats and mechanics. So before starting how to obtain it, let’s quickly delve into the specifics of the Everburn Blade‘s stats, especially if you’re new to the D&D 5e system.
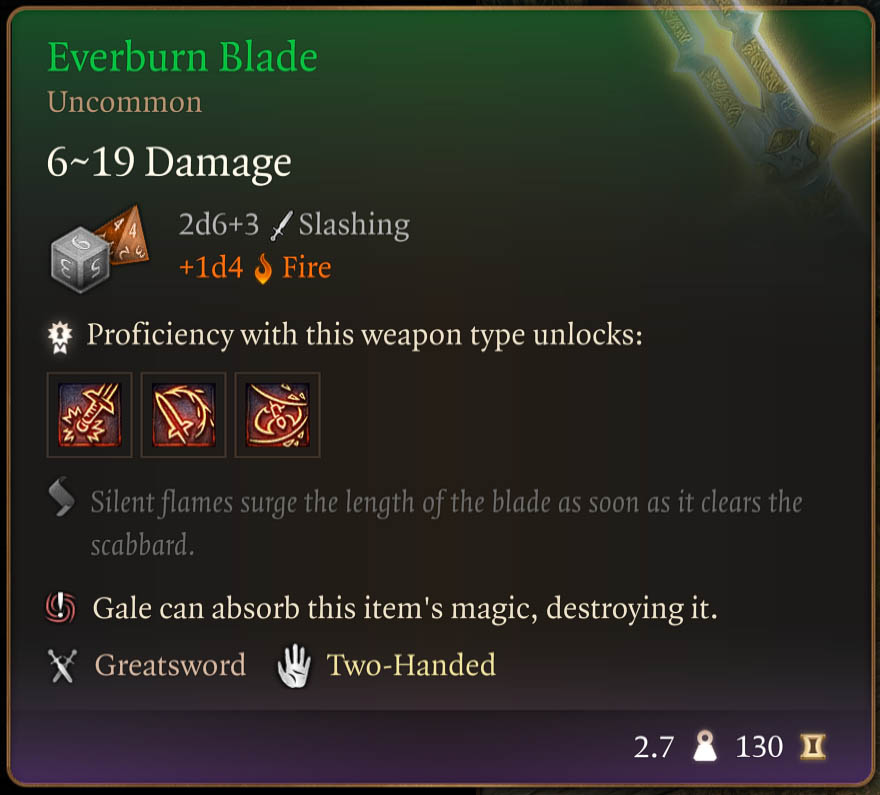
Understanding the Everburn Blade’s Stats in D&D 5e:
- 6-19 Damage:
- This means that when you hit an enemy with the Everburn Blade, you’ll deal a minimum of 6 damage and a maximum of 19 damage. The range gives you an idea of the weapon’s potential power.
- 2d6+3 slashing:
- This is the primary damage the blade deals when it hits.
- “2d6” means you roll two, six-sided dice (the standard dice we all know). So, the minimum you can roll with two dice is 2 (rolling a 1 on both dice) and the maximum is 12 (rolling a 6 on both dice).
- The “+3” means that after you roll those two dice, you add 3 to the total. This represents the blade’s inherent sharpness or power. So, for the slashing damage alone, you can deal between 5 (2 from dice + 3) to 15 (12 from dice + 3) damage.
- +1d4 fire:
- This is additional damage the blade deals because of its fiery enchantment.
- “1d4” means you roll one four-sided dice (a pyramid-shaped dice). The minimum you can roll is 1 and the maximum is 4.
- This damage is added to the slashing damage. It represents the burning effect the blade has on its target due to its magical fire properties.
In Summary: When you hit an enemy with the Everburn Blade, you’ll roll two six-sided dice, add 3 to the result (for the slashing damage), then roll one four-sided dice (for the fire damage).
All these numbers combined will give you the total damage you deal to the enemy.
The blade is powerful not just because of its physical sharpness but also because of its magical fire properties and will carry you through most of the early to mid game without a problem.
Character Creation
Before venturing forth to get the Everburn Blade, we naturally first need to create a new character.
We aren’t going to go with any of the Origin Characters, but instead create our own Custom Character.
While you can use any character to obtain the weapon in Baldur’s Gate 3, there is one specific class that will really make doing this insanely easy, thanks to a specific spell that I will show you in a bit.
Alright let’s get started with our character creation.
Race
First things first, let’s choose our race. This isn’t too important and you can go with whatever you like most.
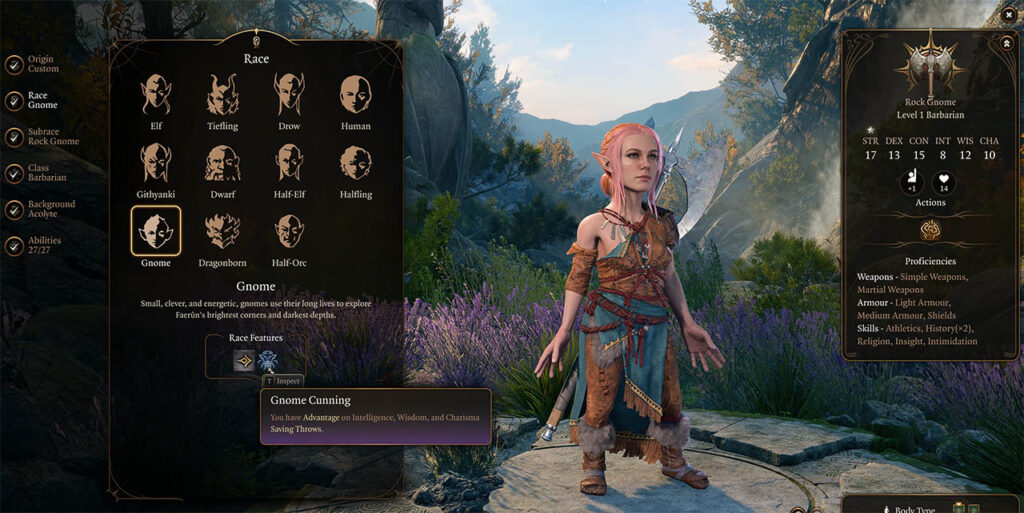
I went with a Gnome due to their special race feature called “Gnome Cunning” that gives Advantage on Intelligence, Wisdom and Charisma Saving Throws.
A Saving Throw is a roll made to resist or avoid a specific effect or outcome, often resulting from spells, traps, or other hazards.
This is however just a nice bonus and not required.
Sub-Race
Next up is choosing a Sub-Race for our character.
There are 3 options for the Gnome Sub-Race, including Rock Gnome, Forest Gnome or Deep Gnome.
Each has its own merits, and you can pick what you like, as it won’t have much effect on the fight.
Class
Next is choosing a class, and this is where it becomes very important.
In order to make obtaining the Everburn Blade insanely easy, you will want to go with the Cleric class.

Clerics specialize in buffing and healing party members or other friendly units, which is going to be important in this upcoming fight.
Some important buffs are part of their Cantrips, which includes “Guidance”, “Resistance” and “Blade Ward”.
Sub-Class
Now for the most important part of the character build, which is the Sub-Class selection.
There are currently 7 Cleric sub-classes to choose from.
All of them are pretty good, including Life Domain, which provides “Cure Wounds” and “Bless Spells”, which are also further buffed thanks to your “Disciple of Life” passive that comes with the sub-class.

However; the real reason we are here is for the Knowledge Domain sub-class.
This is because of one very specific spell that comes with it, which is going to be very overpowered for the fight against Commander Zhalk.
This spell is called “Command” and it’s going to be incredibly fun to use.
Deity & Background
You can select any Deity and Background that you like, as it’s not relevant to the fight against Commander Zhalk.
I would however recommend Guild Artisan or Acolyte that gives the Insight skill, as it is centered around Wisdom, being a Cleric‘s main Ability.
Abilities
When it comes to assigning Ability Points to your Cleric character’s abilities, you must put at least 16 into Wisdom, in order to get a +3 Ability Modifier on your spells. The game will by default give you 17 points, so you can also leave it at that.
From here, you can put the rest of the Ability Points where you wish, as it’s not relevant to the fight. You won’t really be getting hit, as by that point you have already lost.
In the end, I chose:
- 10 Strength
- 10 Dexterity
- 16 Constitution
- 8 Intelligence
- 17 Wisdom
- 13 Charisma
Looking back I would probably have put more into Charisma instead of Constitution, but what’s done is done. Plus you can always re-spec your characters later in the game, once you meet Withers, so its not the end of the world.
Prepare Spells
Last but not least is to select our Prepared Spells.
Here I chose Bane, (which gives a debuff to enemies) but you can also choose Bless, as well as Protection from Good and Evil, Shield of Faith and Healing Word, although I should have selected Cure Wounds as it’s a strong healing spell.
Great! Now that our Cleric is created, let’s start the game.
Forming your party
Once the game starts you are going to have to build up your party members, as we are going to need as much fire power as we can get against Commander Zhalk.
Saving the brain
After you start the game, run into the second room aboard the Nautiloid.
Here you will find an alien lift that will take you up to a man in a chair with an exposed brain.
Talking to the brain starts a dialogue with a few options.
The first gives you 5 options, 3 of which are D20 dice roll based.
- [INVESTIGATION] “Inspect the exposed brain” is Intelligence based.
- [STRENGTH] “Break the skull” is Strength based.
- [DEXTERITY] “Gently prise the brain from the skull” is Dexterity based.
If you created the same character as me, then you won’t really be highly skilled in any of these, so just select any one that you want. They all have a Difficulty Class of 10 to pass the roll, which isn’t too high to pass even without a high Ability Score in Intelligence, Strength or Dexterity.
You can also “Add Bonuses” to your roll if you like.
Whatever you do, do not choose “Destroy the Brain” though.
I went with “Inspect the exposed brain” and passed the check, even though it was very close.
After this, another set of dialogue options will appear. The same Strength and Dexterity ones appear but a new one for [MEDICINE] “Attempt a cerebral extraction, staying mindful of the swelling” option will also be provided.
This is a Wisdom check and as we are a Cleric, this is definitely the option we want to go with and will easily pass thanks to all our added +3 Ability Modifier, +2 Medicine Proficiency and Advantage, giving us two dice instead of 1.
I rolled a 14 and 11, and thanks to Advantage the game chooses the highest roll, being 14. It then adds the +3 and +2 modifiers to the roll, giving me a total of 19, which resulted in an easy Success based on the required 10 Difficulty Class.
You then start to pull at the brain.
With the brain wriggling in your hands you are given one last set of dialogue options. To either spare the brain or mutilate it.
Do not mutilate it, but instead spare it.
It will jump from your hands and land on the ground, before growing some legs. It tells you to go to the helm. Select the “All right, let’s go” option.
The brain, referred to as “Us” is now your temporary companion, which you are going to definitely need for the fight for the Everburn Blade against Commander Zhalk, as he is a very tough opponent, especially if you aren’t playing a Cleric with the Command spell.
Meeting Lae’zel
From here you can run through the door to the outside. Here a cut-scene will play in which you meet Lae’zel, a Githyanki who was also in the intro cut-scene with you.
Lae’zel is also one of the Origin Characters in Baldur’s Gate 3.
You can’t pick any wrong dialogue option when talking to her so choose whatever you like. Once done you will engage in your first battle against 3 flying imps.
This is an easy fight as they can easily be one shotted, and with the brain as a 3rd party member this is even easier.
Loot their dead corpses to pick up the two Crossbows, as we will need them in the fight against Commander Zhalk. The other Thrall corpses you see lying around also have some gold and weapons, but most importantly Potions of Healing, which are very useful in Baldur’s Gate 3 in general.
Once done, you can use the Restoration Pod, which is an alien structure with the light blue glowing tentacles. Clicking on this will heal your entire party back to full health in case you took any damage during the last fight.
Make sure to loot the corpse just past the pod, as it has camp supplies, which are also very important to have for the rest of your game.
From here, climb up the alien webbed netting to the next floor and go through the alien doorway to the next room
Saving Shadowheart
In the next room you will come to a purple and blue console.
You can click and interact with it to go through the dialogue options, which can result in another small battle with the two mages on the alien beds.
This is however optional and I’m going to skip doing that for this guide.
Our main goal here is to head to the top left of the room, where a female Half Elf Cleric is trapped in a Mind Flayer pod.
Clicking on the pod will result in her pleading with you to get her out of the pod in a fearful voice.
You can choose anything other than option 2: “There is no time – I need to get out of here”, as we want to save her.
Selecting option 3 – “I’ll go look around – there must be some way to get this thing open” is the quickest way out of the dialogue.
She tells you to check the contraption, which is another console next to the pod, however you need a key to unlock it, which we currently don’t have so no need to do that until we obtain it.
Before leaving, make sure to pick up the purple Nautiloid Tank next to her by right clicking on it and selecting “Pick Up”. We are going to use this against Commander Zhalk later on.
Next, run to the alien door, on the left, closest to the console. Once it opens another brain appears. If you didn’t saved the first brain in the beginning, he and this other brain will actually attack you here, but because you saved him, they are all your friends instead.
Once inside the next room, loot the corpse for a Gold Key.
Run to the end of the room to another corpse of a woman and loot that as well. This will net you an Eldritch Rune, which is what you need to rescue the Half-Elf in the Mind Flayer pod.
Loot the chest for 2 more Potions of Healing.
Once done, run back out the room towards a table back in the previous room. Here you can pick up a few items, as well as unlock the chest with some gold and an Onyx gemstone inside that you can sell later on for more gold.
Once done, run over back to the console. Click on it to interact and activate it. You can roll an Arcana check here if you like, but it doesn’t make any difference to the end result.
If you are also a Cleric, you will get a +4 modifier here, so it should be an easy success rate.
Once done, select “Place your hand on the console” option.
After this, one last dialogue option appears with a very easy passable Difficulty Check of only 2. As this is also a Wisdom check it’s laughably easy to pass this one.
After the cut-scene, the Half Elf will be released and introduce herself as Shadowheart, who is also one of the Origin Characters.
Let her also join your party, which will now be up to 4 members.
From here, head to the other door in the room, past the table with the previously locked chest.
At this point, make sure to equip both your Cleric character and Shadowheart with a Crossbow in their secondary ranged weapon slots. You should have collected these after the battle with the imps.
The final fight is very ranged based so these will certainly come in handy for these two characters, plus you still have your maces and shields for close up melee combat.
Through the door is another and final Restoration pod, so make sure to top up your parties health if you need to.
If you look closely, you will see that there are also some hot coals on the ground. This can be used to Dip your weapons in, giving them some extra fire damage.
While this buff will wear off before you enter the next room, it’s good to practice with it here so that you get the hang of how it works.
However; be careful not to stand in the coals, as you will take damage. Simply stand next to them and use the Dip skill.
Once done, I would recommend saving at this point by pressing F5 to Quick Save, or creating a manual save, as the next room is where the fight will begin.
The game also creates an auto save for you, but I always like to be extra sure.
Final Battle against Commander Zhalk
With all your members saved and ready, it’s time to fight Commander Zhalk and get your Everburn Blade.
Once you enter a cut-scene will commence showing the Mind Flayer, Devils, Imps and Commander Zhalk fighting it out.
The Mind flayer is actually on your side for this fight, and tells you that he will keep Commander Zhalk busy, while you connect the nerves of the transponder or console.
Once the cut-scene ends you are met with a battle between your party against two lesser Imps and a lesser Hellsboar.
While the game says you have 15 turns to kill him or reach the transponder, you actually only have about 8 and maximum 9 if you get lucky. This because two devil assassins spawn on turn 6 and will reach and one shot your characters by turn 8.
Turn 1
You want to get Lae’zel to the fight against Commander Zhalk as soon as possible so that she can start dealing some damage. Let her skip the fight against the imps and boar, using Dash to run as far as she can, each turn.
The brain unfortunately doesn’t have Dash so let him help kill the small mobs together with your two ranged characters using the crossbows. Do this while they also walk as far as they can towards Commander Zhalk with each turn.
Remember to dip your weapons in the coals for some extra damage. This works for both melee and ranged weapons.
Turn 2
If you used Dash in the first turn with Lae’zel, you should be able to reach and hit Commander Zhalk on your 2nd turn.
You can also push him further back, using the “Shove” action. The further back he is the longer it takes for the two Devils on turn 6 to get to you and him, so this does help a small bit.
Kill Imps and Use Jump
Continue killing the imps and boar with the rest of your party. You can also use the Jump action to gain extra ground with the brain, as you want him in melee range and doing damage to Commander Zhalk as soon as possible as well.
Shadowheart and your Cleric should be able to take the rest down with Crossbow attacks, as they continue to walk towards the fight.
Heal Mind Flayer
Once in range they can start to heal the Mind Flayer with Healing Word and Cure Wounds. He is your main damage dealer against Commander Zhalk, so you want to keep him alive for as long as possible, so healing him is of utmost importance.
You will also see another purple Nautiloid Tank like the one in the room where you rescued Shadowheart. Make sure to also right-click this and pick it up as you pass it.
Turn 3
Lae’zel will tell you to ignore the fight and head for the transponder. Don’t listen to her, she doesn’t know what she’s talking about, as you want that ‘Everburn Blade before you do.
On her 3rd turn, let her use “Pommel Strike” for some extra damage and to possibly Daze Commander Zhalk, followed by a regular attack.
Let your brain “Claw” him, which is his regular attack as well.
Get Shadowheart closer to the fight but just out of range to avoid a Disadvantage de-buff. Let her use her last “Healing Word” on the Mind Flayer.
Then, let her take a shot with the crossbow at Commander Zhalk. It’s only a 30% hit chance but if it lands, every bit of damage helps.
Command Drop Spell
Ok so, this is where the fun begins as its time for all our preparation with the Cleric character, speced into Knowledge Domain for the “Command” spell to pay off.
The Command Spell has 5 options including:
- Command: Grovel
- Command: Flee
- Command: Drop
- Command: Approach
- Command: Halt
The one we want is Command: Drop. Cast this onto Commander Zhalk and if it lands he will actually drop the Everburn Blade where he stands!
You only have one cast of this spell though, so you best hope it lands.
If the spell successfully rolls and he drops the blade weapon, simply let Lae’zel pick it up, which not only makes her insanely strong at this point, but also disarms Commander Zhalk, meaning that he is going to hit like a wet noodle for the rest of the fight, therefore posing no further danger to the Mind Flayer or your party.
How amazing and easy is that?! Some might call it cheese. I call it brilliance.
From here you can either continue killing him for the Steam achievement called “Devil’s in the Details”, or to just head towards the transponder to end the fight and get off the ship.
Carry on Fighting to earn Steam Achievement
If you continue to try to kill him and the Mind Flayer, then at this point it is a good idea to use our last secret weapon.
Remember those two purple Nautiloid tanks we picked up earlier? Well open up your inventory on the character you have them on, then drop and drag one or both of them next to Commander Zhalk.
Have Lae’zel start to run out of the combat zone towards the transponder.
Shoot the purple Nautiloid Tank
Use Shadowheart or your Cleric to hit the purple Nautiloid Tank with a crossbow, so that its goo spreads along the floor.
Now it’s time to light things up!
Once the flammable goo is on the floor and its Lae’zel turn again, use a manual attack and click on the goo on the floor. Because you are now wielding a fire blade, you will ignite the flammable goo like gasoline, causing it to burn both enemies.
If you placed the second barrel there as well, it too will explode on top of the burn, causing extra damage and knocking them back.
This will however knock Lae’zel unconscious as well, causing her to be Downed, but she can be helped back up by a nearby party member. She can then use her Second Wind heal to gain some health back.
From here just continue to kill them with your party members, while making at least one member run towards the transponder in case the kill attempt fails.
Note that this cannot be the brain, only your main character, Lae’zel, or Shadowheart can activate the transponder.
In my attempt, he unfortunately killed the Mind Flayer and the two Devil reinforcements arrived so I decided to rather get out. I did however not keep hitting him as much as I should have, as I had too many characters running for the transponder.
So learn from my mistakes.
Either way, I got the Blade and already had the achievement previously.
Just take the blade and get out
If you haven’t gotten it, it is worth sticking around to try to kill Commander Zhalk for the Steam achievement.
However; if you already have the blade in your possession, then there isn’t much else worth staying for, in terms of what the two enemies drop. So if you want to just take your blade and get out, then simply head for the transponder.
Again, you only need one member to reach it, not your entire party, so it’s pretty easy to do.
You can ignore the spawned imps and boar as well, as they don’t pose much of a threat.
Once clicked a cinematic will play showing the ship crashing. Once the cinematic ends, the Everburn Blade is now yours to wield for the rest of the game.
Congratulations, and enjoy your new hot, fiery weapon!
How to finish with no Command: Drop spell
In the event that you don’t have a character with the Command: Drop spell, or it doesn’t land, you will need to continue the fight as normal and kill him before the two Devils come and wipe out your party.
Thanks to the preparation we made this is definitely possible, and we still have another trick up our sleeves as well.
Turn 4 & 5
At this point you should be out of healing spells with both Shadowheart and your Cleric (if you have one), as the Command: Drop spell used up your second slot.
Use Cantrip Buffs on Mind Flayer
Not to worry. Just continue hitting Commander Zhalk with your attacks while buffing the Mind Flayer using your Cantrip buffs such as Guidance, Resistance and Blade Ward.
Unlike the spells, the Cantrips have unlimited uses, so keep using them each turn and attack with your crossbows when you can.
Commander Zhalk won’t attack you until the Mind Flayer is dead, so don’t worry about buffing your own characters. Just focus on the Mind Flayer.
Hopefully he will get some hits in while Lae’zel and the brain get some Critical hits in too. The brain proved to be an invaluable asset in this fight as he landed 2 critical strikes alone.
You can also continue to use Shove to push him back after attacking with Lae’zel.
Watch out for spawn point
Do note that if you pass a certain point in the fight, it will trigger another short cut-scene, after which two imps and a Hellsboar will spawn, so be careful.
If you did spawn them like me, then don’t focus on killing them too much as you want all your fire power hitting Commander Zhalk.
However; While they don’t do much damage they do cause Disadvantage when they stand next to a ranged character, impeding their movement, as well as lowering their hit chance, which we certainly don’t want. You are then forced to either use your melee weapon or to use Disengage, but this wastes a turn on that character.
So deal with them as you deem necessary.
Turn 6
On the 6th turn, (with 9 turns remaining), two Devils will come to help him, coming through the door you entered the room in.
Watch out for Devils
They also have Dash and will use it to reach your party members by Turn 8, where they can easily one shot them. For this reason, time is now very limited.
Start placing purple Nautiloid Tanks
To help speed things up, you can again start placing down one of the purple Nautiloid tanks that we picked up earlier, in front of Commander Zhalk.
Turn 7
On turn 7, we are going to use these tanks as explosion devices. It’s therefore best to start moving Lae’zel out of the combat zone to avoid taking a lot of damage or worse, Downing her.
Instead, have her get her turn’s strike in on Commander Zhalk, (hopefully hitting him) and then make her start heading for the transponder.
She can continue killing the imps and boar on the way during her next turns. Remember she also has a single self heal called Second Wind if you need to use it.
Shoot the purple Nautiloid Tank
Use Shadowheart or your Cleric to hit the purple Nautiloid Tank with a crossbow, so that its goo spreads across the floor.
Dealing with Disadvantage
At this point, the Mind Flayer actually attacked and killed the Hellsboar for me, so that was a bonus surprise.
This was most likely due to him walking within the Mind Flayer’s Disadvantage range, giving him an Opportunity Attack.
If the imps or boar are causing Disadvantage on Shadowheart and your Cleric, then simply hot-swap to your mace and shield to strike them or continue buffing the Mind Flayer with your Cantrip buffs.
As mentioned earlier, don’t use your crossbow on Commander Zhalk when they are next to you, as the Disadvantage de-buff causes your ranged characters to only have a 6% chance to hit.
You can also use Disengage to run away from them without getting hit in the back, however this uses up a turn.
Turn 8
By Turn 8, the two Devils will now reach the Mind Flayer.
If you pushed Commander Zhalk back far enough, then they most likely will need to use a second Dash spell to reach him, meaning that they can’t attack this round.
While I love our little brain friend, it’s best to have him stay in the fight zone and continue doing damage to Commander Zhalk as well as be a distraction for the Devils. Although, you can probably try to get him out, in the event that Commander Zhalk is low enough for the Mind Flayer to kill him.
At this point I got slightly lucky and was able to down Commander Zhalk with a nice shot from Shadowheart. The only thing to do now is to go in a pick up the Everburn Blade, while the Mind Flayer and Devils duke it out.
While the brain was actually still alive at this point, the Mind Flayer weirdly focused on him after Commander Zhalk fell, and not the Devils for some reason, unfortunately killing him.
RIP my little friend, thank you for your valiant efforts.
I then used my Cleric to run in and grab the Everburn Blade, followed by a Disengage to avoid getting hit, then running back as far as I could.
Turn 9
On turn 9, the two Devils will now start hitting your party members so it’s vital to get to the transponder and end the fight.
I actually tried using Lae’zel’s Githyanki Mage Hand Cantrip to interact with the transponder but it didn’t work, saying “Not enough Space” so I’m not sure why that happened.
Either way, I used her to run around the remaining imp (avoiding Disadvantage and Opportunity Attack), towards the transponder.
Turn 10
By turn 10, the Devils should now kill the Mind Flayer, but it’s too late for them as Lae’zel, or one of your other characters, should be right next to the transponder. Clicking it will end the fight and cause the cinematic to commence, as we watch the ship crash.
Conclusion
Once you wake up on the Ravaged Beach, you will have the Everburn Blade in your inventory if your character was the one to pick it up.
If not, don’t worry you will soon see and wake up Shadowheart and she will have it in the event that she was the one to pick it up during the fight.
If Lae’zel picked it up she will have it once you meet up with her, later in this area as well.
You can chat about it in the Weapons Forum where others might have even more tips that I didn’t know or cover in this guide.
And that’s it, I hope you enjoyed this guide as the official and proud owner of one amazing weapon that will carry you far into the game.